
What does vulnerability management mean for AppSec?
Vulnerability management in application security is the process of finding, evaluating, fixing, and tracking security weaknesses in your software. It starts when a scanner reports a finding and ends when the fix is verified in production.
Most organizations already manage infrastructure vulnerabilities — patching servers, updating firmware, applying OS security updates. Application security vulnerability management is a different discipline.
The vulnerabilities are in custom code that your developers wrote, in open-source libraries your applications depend on, and in configuration decisions made during development.
The tools are different. Instead of Qualys or Tenable scanning servers, you run SAST against source code, DAST against running applications, SCA against dependency manifests, and IAST inside application runtimes.
Each produces findings in its own format, with its own severity model, and its own false positive characteristics.
The ownership is different. Infrastructure patches are applied by operations teams.
Application vulnerabilities are fixed by development teams who also have feature work, tech debt, and deadlines competing for their time.
Without a structured lifecycle, vulnerability findings pile up in dashboards that nobody looks at.
According to Veracode’s 2024 State of Software Security report, the average application carries dozens of open vulnerabilities at any given time. Getting that number down requires a process, not just more scanning.
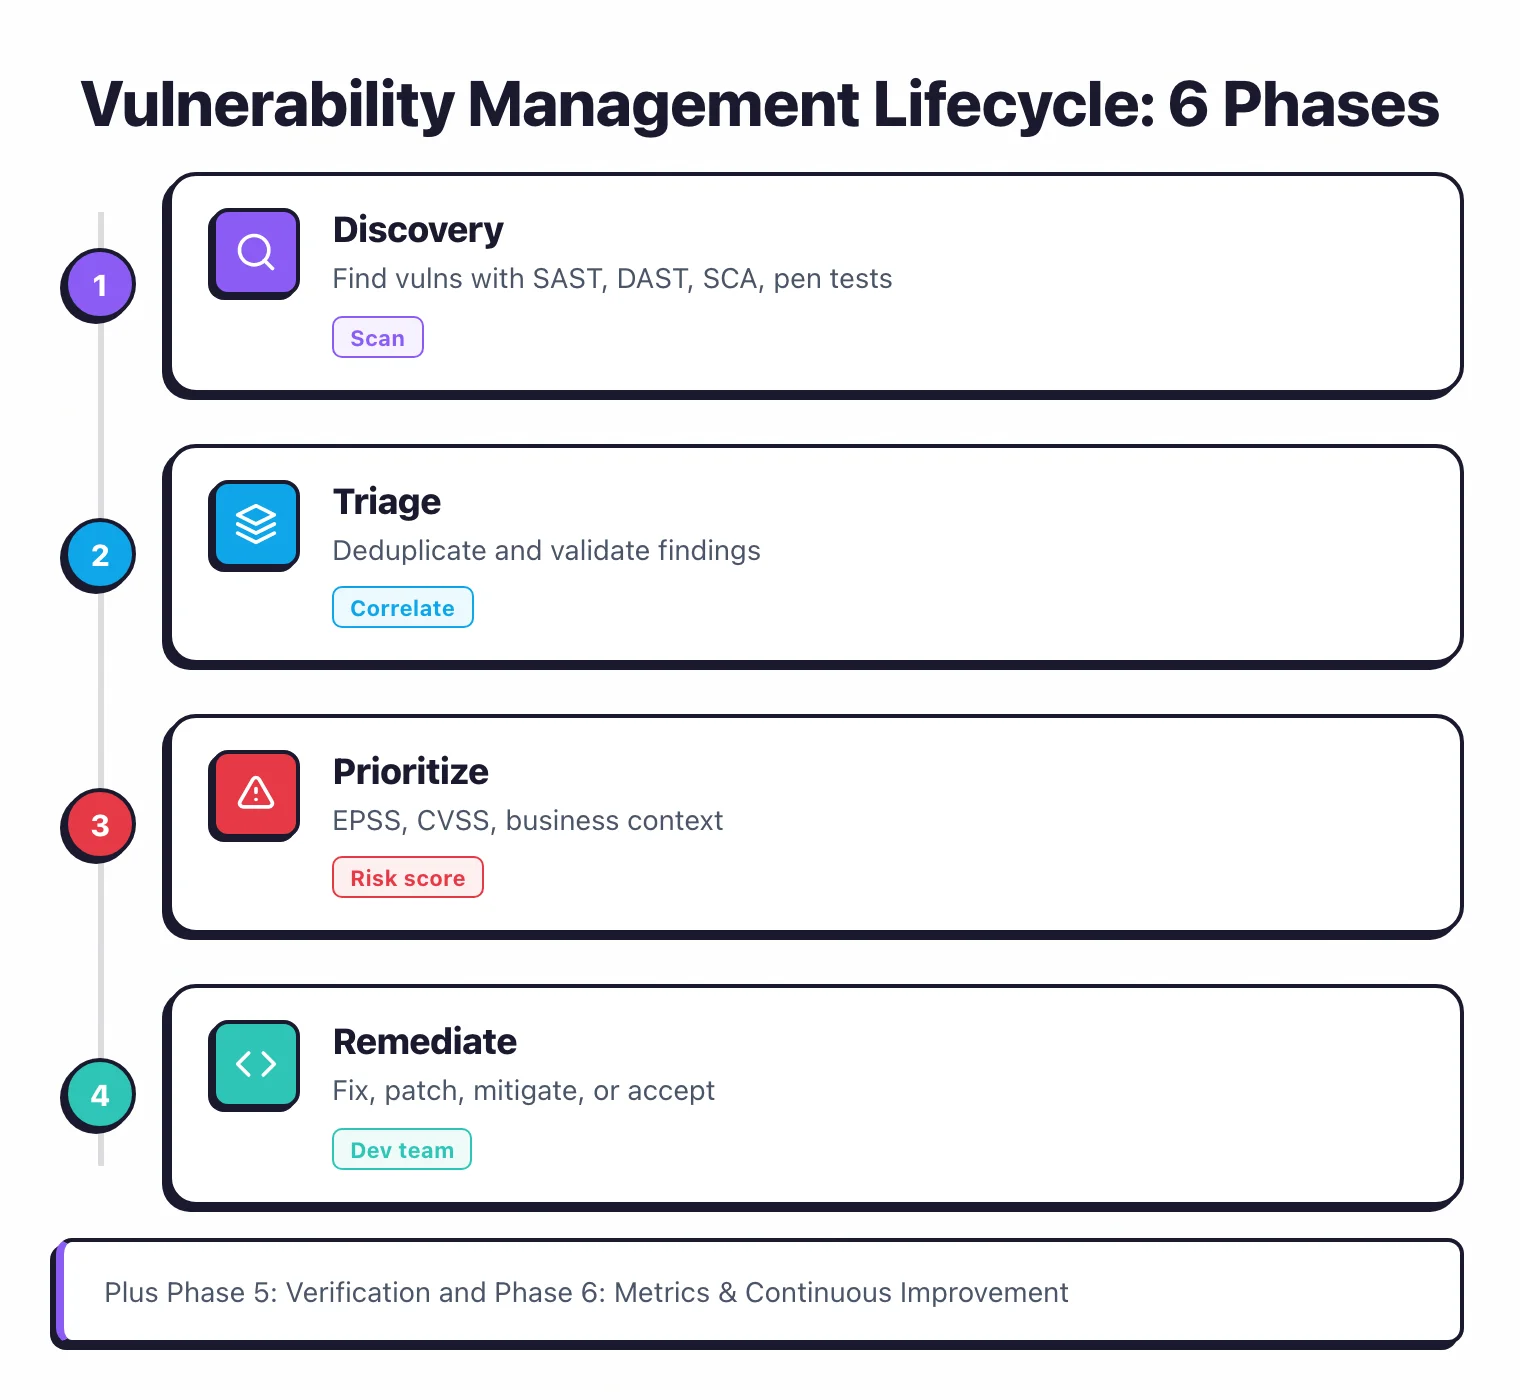
The canonical authority for the lifecycle frame is NIST SP 800-40 Rev 4, the Guide to Enterprise Patch Management Planning. Most enterprise vulnerability management programs anchor their phase definitions there, with adjustments for AppSec-specific tooling and ownership.
Phase 1: Discovery
Discovery is running the right scanning tools at the right points in your software development lifecycle. The goal is to find vulnerabilities early, before they reach production.
Where to scan
IDE and pre-commit. Semgrep, Snyk Code, and SonarLint catch issues as developers write code. Fastest feedback loop, lowest fix cost.
Pull request / CI. SAST and SCA scans run automatically on every code change. Block merges when critical issues are found. This is where most teams start.
Staging / QA. DAST scans run against deployed applications. IAST agents instrument test environments and report findings during QA testing.
Production. RASP monitors running applications and can detect attacks. SCA continuously monitors for newly disclosed CVEs in deployed dependencies.
Scanning tools by type
| Type | What it scans | When it runs | Example tools |
|---|---|---|---|
| SAST | Source code | IDE, PR, CI | Semgrep, Checkmarx, SonarQube |
| SCA | Dependencies | PR, CI, continuous | Snyk, Dependabot, FOSSA |
| DAST | Running app | Post-deploy, nightly | ZAP, Invicti, StackHawk |
| IAST | Running app (internal) | During testing | Contrast Assess, Seeker |
| Secret scanning | Code + history | Pre-commit, CI | GitGuardian, Gitleaks, TruffleHog |
The common mistake in this phase is running too many overlapping scanners without a plan for handling the output. Three SAST tools do not find three times the vulnerabilities.
They find mostly the same things with different severity labels and different false positive profiles.
Pick one primary tool per scanning type. Add a second only when the first has a known gap for your technology stack.
Phase 2: Triage and deduplication
Triage separates real vulnerabilities from noise. This is where most AppSec programs break down.
The deduplication problem
Running SAST, SCA, DAST, and IAST against the same application produces overlapping findings.
A SQL injection might appear as a SAST finding (code pattern), a DAST finding (exploitable endpoint), and an IAST finding (observed data flow). That is one vulnerability reported three times with three different formats.
Without deduplication, your teams see inflated counts and waste time investigating the same issue from multiple reports. ASPM tools like Apiiro, ArmorCode, Invicti ASPM, and Ox Security automate this correlation. They ingest findings from all your scanners, match duplicates, and present a single view.
Validating findings
Not every scanner finding is a real vulnerability. SAST tools report patterns that might be vulnerable without runtime context.
DAST tools infer vulnerabilities from response behavior that could have other explanations.
Validation strategies:
- Automated verification. Some tools verify their own findings. Invicti’s proof-based scanning confirms exploitability. IAST findings are inherently verified because the agent observed the actual data flow.
- Manual review. A security engineer reviews the finding, checks the code, and confirms or dismisses it. This is time-consuming but necessary for ambiguous cases.
- Developer context. The developer who wrote the code often knows immediately whether a finding is real. Route findings to code owners rather than sending everything to a central security team.
Routing to the right team
Findings need to reach the people who can fix them. Map findings to code repositories, map repositories to team ownership, and file issues in the team’s existing issue tracker.
Asking developers to check a separate security dashboard does not work. Put findings where developers already work: Jira tickets, GitHub issues, or PR comments.
Phase 3: Prioritization
Not all vulnerabilities carry the same risk. Treating them equally leads to either paralysis (too many “critical” items) or missed real threats (fixing low-risk issues while critical ones wait).
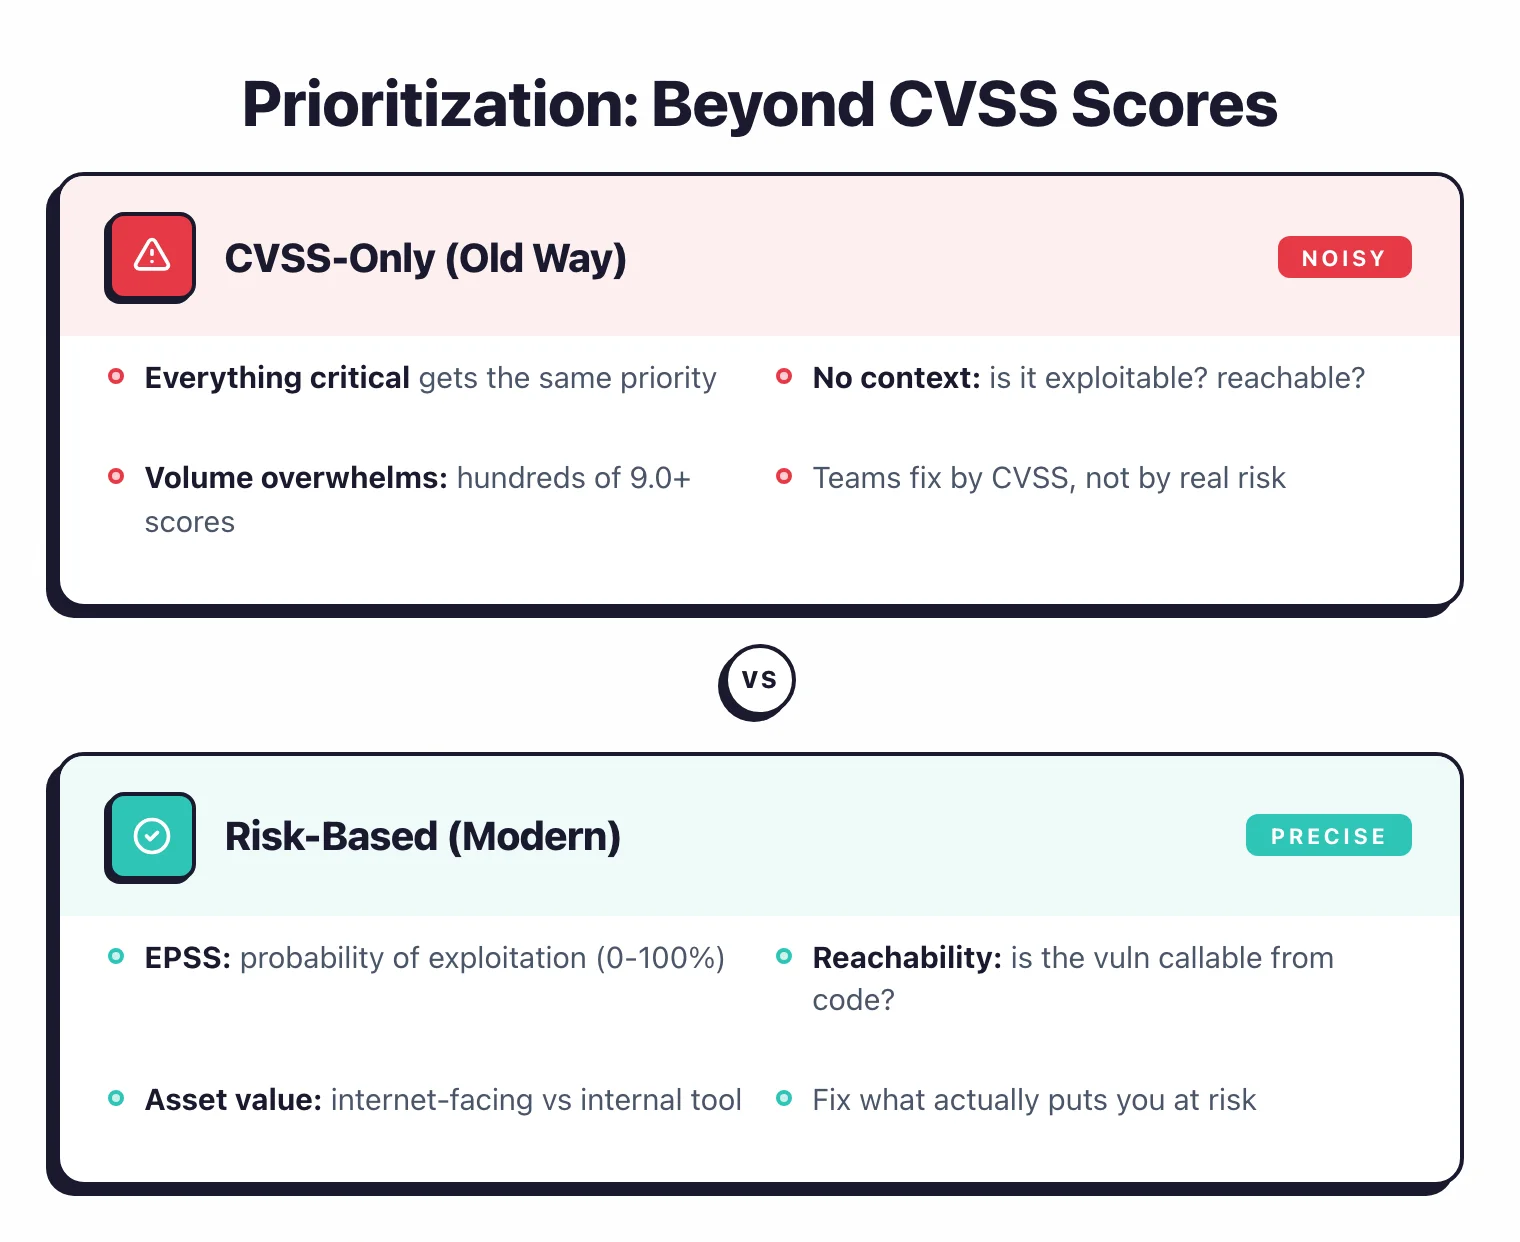
Beyond CVSS scores
CVSS scores tell you how severe a vulnerability could be in the worst case. They do not tell you how severe it is in your specific environment.
A CVSS 9.8 SQL injection in an internal admin tool used by three people is not the same risk as a CVSS 7.5 XSS in your public-facing checkout page that processes credit cards.
Risk-based prioritization factors
Exploitability. Is this vulnerability reachable from the internet? Does a working exploit exist?
CISA’s Known Exploited Vulnerabilities (KEV) catalog and EPSS (Exploit Prediction Scoring System) provide data on active exploitation. A vulnerability being actively exploited in the wild jumps the queue regardless of CVSS score.
Application context. What data does the application process? Is it internet-facing or internal?
What is its business criticality? A vulnerability in your payment processing service carries more risk than the same vulnerability in an internal documentation site.
Data sensitivity. Applications handling PII, financial data, or health records demand faster remediation. A data breach through these applications has regulatory and financial consequences.
Compensating controls. A WAF rule that blocks the attack payload, network segmentation that limits access, or input validation at the API gateway may reduce the effective risk enough to deprioritize a finding.
Practical priority framework
| Priority | Criteria | Target SLA |
|---|---|---|
| P0 - Emergency | Actively exploited, internet-facing, sensitive data | 24-72 hours |
| P1 - Critical | Exploitable, internet-facing OR sensitive data | 7 days |
| P2 - High | Exploitable but with compensating controls, or internal-facing with sensitive data | 30 days |
| P3 - Medium | Potential vulnerability, internal-facing, no sensitive data | 90 days |
| P4 - Low | Informational, best practice, defense-in-depth | Next sprint cycle |
This is a starting point. Adjust based on your organization’s risk tolerance and remediation capacity.
SLAs you cannot meet are worse than no SLAs because they erode trust in the process.
Phase 4: Remediation
Remediation is where security findings become code changes. This phase depends entirely on developers, which means it competes with every other demand on their time.
Developer workflows
The most effective remediation happens when findings are integrated into the developer’s normal workflow. That means:
- PR-level findings. SAST and SCA findings appear as comments on pull requests. The developer fixes them before merging, as part of the normal code review process.
- Sprint integration. Security issues are filed in the same backlog as feature work. Product owners see them alongside other priorities. Security gets a seat at the planning table rather than shouting from a separate dashboard.
- Fix guidance. Generic “fix this SQL injection” is not helpful. Provide specific remediation — show the code change, link to documentation, offer a code suggestion. Snyk and Semgrep provide auto-fix suggestions for many vulnerability types.
Ownership models
Distributed ownership. Each development team owns the security of their applications.
The security team provides tools, training, and consultation, but teams fix their own bugs.
This scales better than a central security team trying to fix everything.
Security champions. One developer per team takes on additional security responsibility: triaging findings, mentoring teammates on secure coding, and acting as the bridge between security and development.
This works when the champion has allocated time, not just an extra title.
Central remediation team. A dedicated team fixes security issues across the organization.
This works for small organizations or for addressing critical findings in legacy applications where the original developers are gone.
What to do when remediation stalls
Findings that sit open for months are a symptom, not a root cause. Common reasons:
- The finding is in a legacy codebase with no active owner
- The fix requires an architectural change that is too expensive for the risk
- The development team disagrees that the finding is real
- The priority is low and keeps getting bumped by feature work
For each, there is a different response. Assign legacy code owners.
Accept risk formally for architectural issues (documented, time-bounded, with compensating controls). Have the security team validate disputed findings. Protect sprint capacity for security work.
Phase 5: Verification and closure
A vulnerability is not fixed until the fix is verified. “I deployed the patch” is not verification. “I re-scanned and the finding is gone” is.
Verification methods
Automated re-scanning. Run the scanner that found the original vulnerability against the fixed code or application. If the finding disappears, the fix is confirmed.
Most CI/CD-integrated tools do this automatically on the next scan.
Targeted testing. For high-severity findings, run a specific test case that reproduces the vulnerability. If the test passes, the fix works.
This is more reliable than waiting for the next full scan.
Regression testing. Verify that the fix does not break existing functionality. Security fixes that cause production outages are worse than the vulnerability they addressed.
Closure criteria
- The original finding no longer appears in scans
- The fix is deployed to production (not just merged to main)
- No regression in application functionality
- The finding is marked as resolved in the tracking system with a link to the fix
Reopen tracking
Track how often closed vulnerabilities reopen. A reopen rate above 10% suggests that fixes are incomplete, that the vulnerability has multiple instances, or that the scanner has inconsistent detection.
Each reopen is an opportunity to improve your remediation process.
Phase 6: Metrics and continuous improvement
Metrics tell you whether your vulnerability management process is getting better over time. Without measurement, you are guessing.
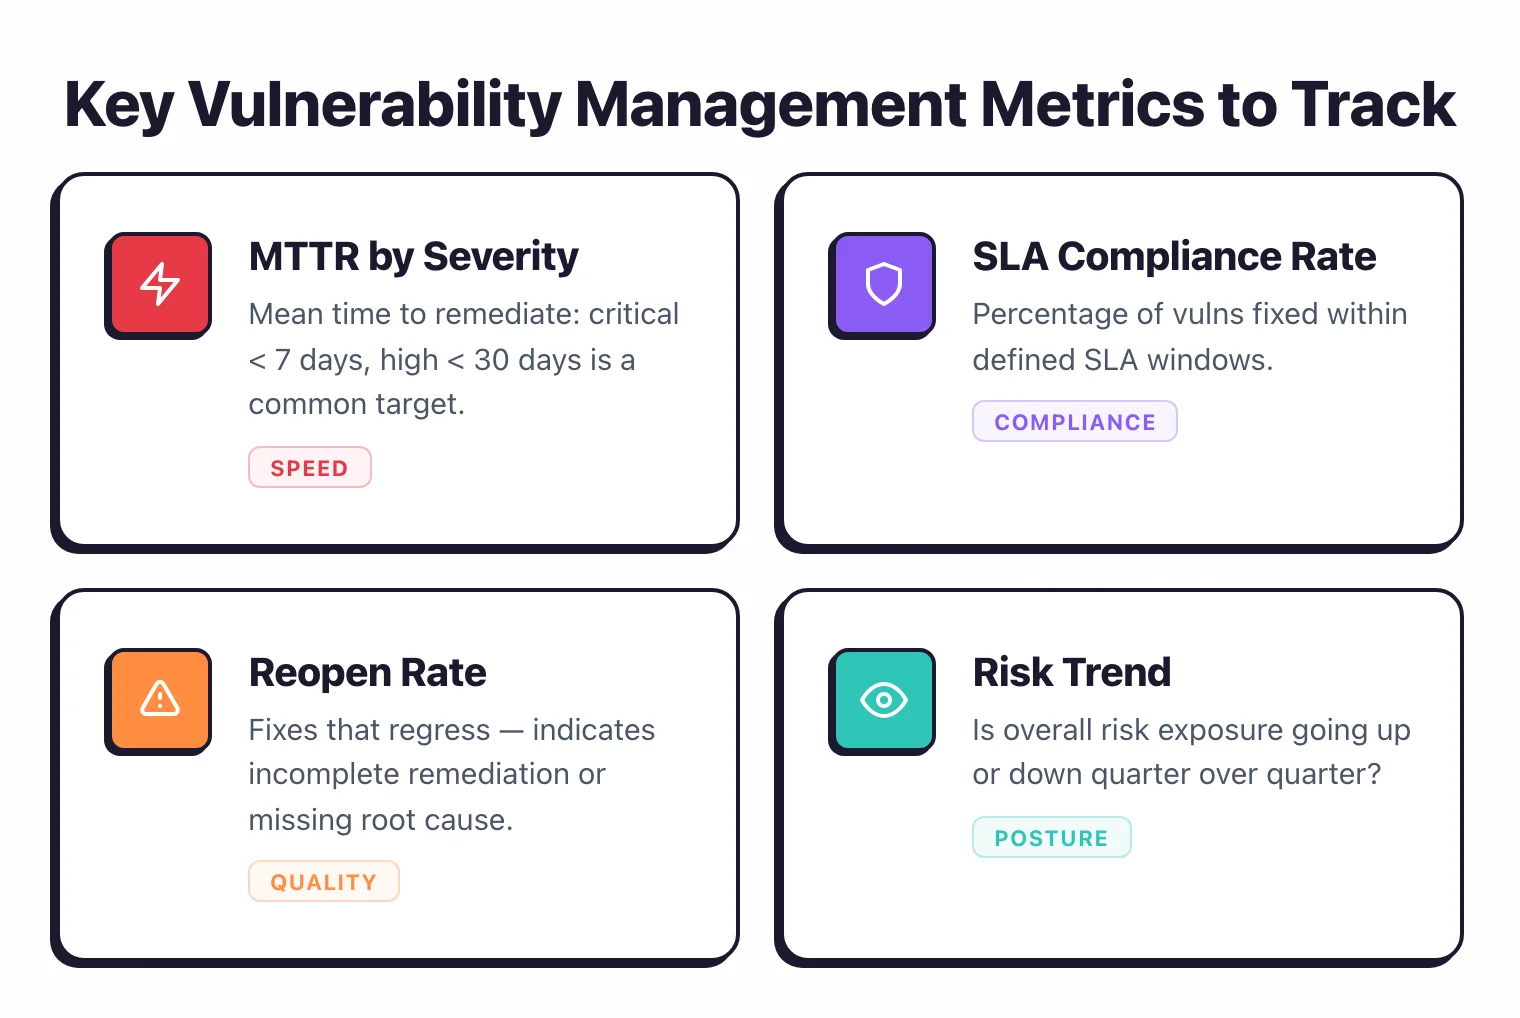
Key metrics
Mean time to remediate (MTTR). How long from discovery to verified fix, broken down by severity.
Track this monthly. If MTTR is increasing, your process has a bottleneck.
Vulnerability density. Number of open vulnerabilities per application or per thousand lines of code. This normalizes across applications of different sizes.
SLA compliance rate. Percentage of findings fixed within their target SLA. Below 80% means your SLAs are unrealistic or your remediation process is broken.
Introduction vs fix rate. Are you fixing vulnerabilities faster than you are creating new ones?
If the backlog grows month over month, you have a systemic problem.
Scanner coverage. Percentage of applications with active SAST, DAST, and SCA scanning. Gaps in coverage mean undetected vulnerabilities.
What good looks like
Mature AppSec programs typically see:
- Critical MTTR under 14 days
- High MTTR under 45 days
- SLA compliance above 85%
- Stable or declining vulnerability backlog
- 90%+ scanner coverage across active applications
These numbers are targets, not starting points. If your critical MTTR is currently 60 days, set a goal for 30 and work from there.
Improvement actions
When metrics show problems, trace them to root causes. High MTTR often means findings are stuck in triage or waiting for developer time.
Growing backlogs often mean you are scanning faster than you can remediate — either slow the rollout of new scanners or increase remediation capacity. Low coverage means some applications are not being scanned at all. Fix coverage gaps before adding more scanning tools.
For more on building AppSec metrics, see AppSec Santa’s DevSecOps program guide.
What are the most common breakdowns and how do you fix them?

“We scan everything but fix nothing”
The most common failure. Scanning tools are easy to deploy.
Getting developers to fix what they find requires process, ownership, and prioritization.
Start by enforcing quality gates on new code (no new critical findings merge) and set a realistic burn-down rate for existing backlog.
“Too many false positives, developers stopped looking”
Tool noise destroys trust. If more than 20% of your findings are false positives, either tune the tool, switch to a more accurate one, or add validation before routing findings to developers.
IAST and proof-based DAST have lower false positive rates than traditional tools. Pre-validated findings get fixed faster.
“Everything is critical, so nothing is critical”
When your prioritization labels everything as critical or high, developers cannot distinguish between real emergencies and standard findings. Apply the risk-based framework in Phase 3.
Be honest about what is actually P0 versus P2. Fewer than 5% of findings should be P0.
“Security and development are in constant conflict”
This happens when security files hundreds of tickets without context and developers see them as roadblocks.
Fix it by integrating findings into the development workflow, providing specific remediation guidance, and giving developers credit for security work. Track security fixes in sprint velocity.
“We have no idea what our actual risk is”
Usually means findings are scattered across multiple tools with no aggregation. An ASPM tool or even a simple spreadsheet that consolidates findings across scanners, maps them to applications, and tracks remediation status gives you the visibility you need.